KNOT TYING FOR BOATING
LEARN POPULAR BOATING KNOTS - STEP BY STEP
Knowing how to confidently and successfully operate a boat requires extensive knowledge of boating techniques on and offshore. One of the most important skills a boater should learn is how to tie knots for boating. Not only are boat knots important to know but it’s always fun to learn new ones. Have a look at this site Animated Knots to learn how to tie lots of fun and important boating knots.
The first thing you should know about boating knots is that not all knots are referred to as knots. The term “knot” refers to knots tied on the end of a single rope line. Bends are knots used to join two lines together. Hitches are knots used to secure rope lines to another object that’s not another line, such as a cleat or stanchion.
Types of Knots, Their Purposes and How to Tie Them
There are many types of nautical knots, but which are considered important boating knots boat owners should know? Here is a quick guide discussing a few essential knots for boaters to use, why they are used for boating and how to tie them correctly.
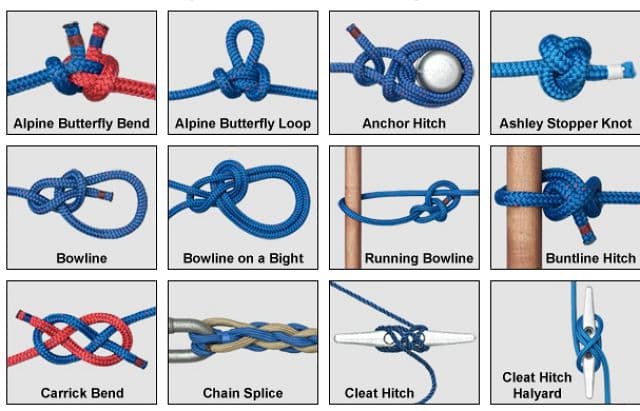
BOWLINE BOATING KNOT
The bowline knot is one of the basic knots we believe all boaters should master. Of the many important boating knots you should know, the bowline knot is relied on for its versatility due to the fact that its fixed noose won’t allow the rope to run or slip. Although it’s secure, it can be easily untied manually no matter how tight the knot is. Practice these steps to tie a boeline knot:
1. First, lay the rope across your non-dominant hand and make a small loop in the rope.
2. Run the working end through the loop from the underside.
3. Next, wrap it around the standing line and down through the loop’s topside.
4. Pull the working end to tighten.
For more robust tightness, use a double bowline knot. This involves the same steps as a traditional bowline knot except you’ll wrap the rope around your hand twice.
STOPPER KNOT
Any time you tie a knot in a line, you hope you’ve used the correct knot, bend or hitch properly and it won’t come loose. Unfortunately, a great knot might not stop a line from pulling through a rope clutch. Thankfully, you can tie a stopper knot to the end of any rope to prevent this from happening. Stopper knots do not come untied easily like other knots, making them ideal for heavy-duty applications. To tie a stopper knot:
1. Wrap the working end of the line around your palm twice.
2. Slide the working end beneath the two loops created.
3. Remove the rope from your hand and use the working end to pull it tight.
CLEAT HITCH
When securing a line to a cleat — fittings which temporarily or permanently secure a line from a boat to a dock — you need to use a proper cleat hitch. Using another knot, bend or hitch is not recommended, making the cleat hitch knot one of the essential knots for boaters to know. If you have any spare time on a dock, deck or boat, practice tying a cleat hitch knot by performing these steps:
1. Wrap the line one full time around the cleat.
2. Make a figure-eight around one horn of the cleat.
3. Make another figure-eight around the other horn of the cleat.
4. Pass the working end under the line and pull to tighten.
CLOVE HITCH
The rolling hitch is more secure, but if you need an effective hitch to secure your vessel to a pole temporarily, you can also use a clove hitch. Clove hitches are used for different applications, particularly those which aren’t heavy-duty, like securing fender whips. The lines of these hitches require constant pressure and can come loose through significant movement. To tie a clove hitch to a pole:
1. Wrap the rope around the pole once.
2. Pass the rope over the top of itself as you wrap it a second time.
3. Slide the working end under the second wrap and pull to tighten.
ANCHOR HITCH
The anchor hitch is unsurprisingly used regularly to tie a rope to an anchor then secure the anchor to the ship. Other uses include securing the rope to a ring or another point of termination.
1. Run the working end of the rope through the anchor’s shackle twice, leaving both turns open.
2. Take the working end behind the standing line of the rope then feed it through the first turn and tighten.
3. Tie the working end of the rope to the standing line with a backup knot to ensure that it doesn’t come undone and lose your anchor.
FIGURE-EIGHT KNOT
If you’re new to boating but have a little knowledge about ropes, you may have heard of the figure-eight knot in another context. The figure-eight knot is also used in rock climbing. Boaters prefer this popular easy to undo knot because it provides a safe, simple and secure way to keep two ropes together. To tie a simple figure-eight knot in a single rope, follow these steps:
1. Make a single loop on one end of the rope.
2. Pass the working end of the rope through the loop.
3. Pull both sides of the rope to tighten the knot.
Practice these steps to learn how to tie a figure-eight bend with two ropes:
1. Take one rope and make it into the shape of a figure-eight.
2. Taking the second rope in your hand, you’ll want to feed its working end around the knot where the working end of the first rope is.
3. Keep both ropes parallel while feeding the second knot in.
4. Pull gently on the working ends, then on the standing lines, alternating between the two until the knot is tight and symmetrical.
For more information about how Tampa Yacht Sales can help you find the boat of your dreams contact Shane Faunce at (727) 513-7615 for more information or view our current listings.